
Overview
Revenue Tagging in Hapana allows you to categorize and track revenue for greater financial insight. With this feature, you can tag offer-based revenue (subscriptions, packages), inventory and merchandise sales and ancillary fees.
Why Revenue Tagging matters:
-
Accurate allocation – Assign revenue directly to the correct GL code or Profit Center.
-
Compliance & audit readiness – Ensure accurate tax reporting.
-
Performance insights – Identify profitable services and channels.
-
Better forecasting – Use segmented financial data for strategic planning.
Prerequisites
Before enabling Revenue Tagging, ensure that:
-
You have Admin permissions to access Payments > Retail Configurations > Retail Settings.
Enable Revenue Tagging
1. Navigate to Retail Settings & Activate Revenue Tagging
-
Go to Payments from the main menu.
-
Select Retail Configurations.
-
Click Retail Settings.
-
In the Revenue Tagging section, switch the Revenue Tagging toggle ON.
-
ON – All new Offers and Inventory Items require a tag.
-
OFF – Tag fields are hidden, but historical tags remain in reports.
-
Tip: Only Admins can enable or disable Revenue Tagging.

Create and Manage Revenue Tags
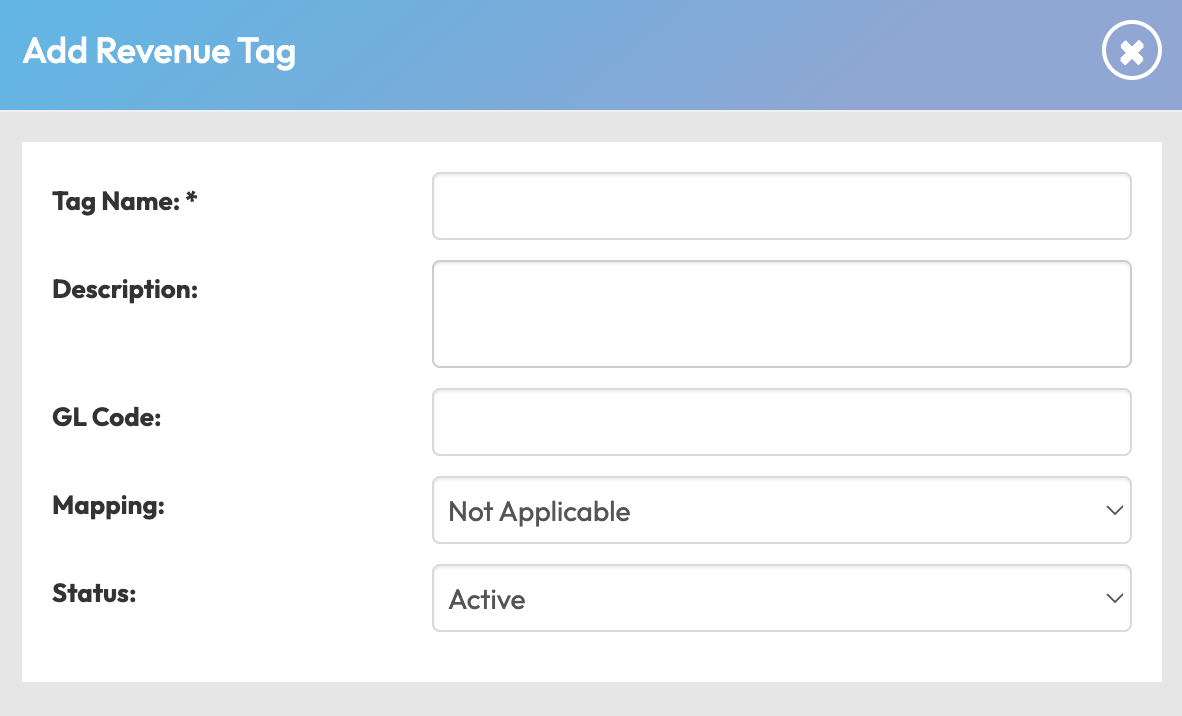
1. Add a New Tag
-
In Retail Settings, click + Add New Tag.
-
Complete the fields:
-
Tag Name - enter tag name (mandatory field)
-
Description – enter description (optional)
-
GL Code – enter GL Code (optional)
-
Mapping – Select:
-
N/A – Tag at the product level (packages, memberships, inventory, gift cards).
-
One Time Setup Fee – Global mapping per location.
-
Secondary Recurring Fee – Global mapping per location.
-
Dishonour Fee – Global mapping per location.
-
Late Cancel Fee – Global mapping per location.
-
No Show Fee – Global mapping per location.
-
-
Status – Active or Inactive.
Tip: Mappings are unique - only one tag can be assigned to a specific mapping per location.
Assign Tags to Products
Mapping rules:
-
A mapping type can only be linked to one tag per location.
-
Mapping = N/A means the tag is assigned at the product level.
This means you cannot have multiple Revenue Tags to multiple Mappings. No Show Fee can only be associated with one Revenue Tag.
1. At the Product Level
When Mapping is set to Not Applicable, you can assign tags to:
-
Membership Packages
-
Session Packages
-
POS Inventory items (at product level)
-
Gift Cards (default global setting for all sales)
2. For Global Fees
Assign tags directly under their fee type:
-
One Time Setup Fee
-
Secondary Recurring Fees
-
Dishonour Fee
-
Late Cancel Fee
-
No Show Fee
Expected Outcome
Once enabled and configured:
-
Every revenue-generating product or fee has an assigned tag.
FAQ
Q: Can I assign multiple tags to the same fee type?
A: No. Each fee type can only have one tag per location.
Q: Do tags update past transactions?
A: No. Tags apply to new transactions after the change.
Q: Can I disable Revenue Tagging later?
A: Yes, but historical tags remain in reports.
Reach out to our support team via support@hapana.com if you need help.